Social media thrives on images: Instagram is a visual platform i.e., you have to post an image, but a caption is optional, and while Facebook enables you to do either/or, research consistently shows posts with images have 2.3 times more engagement than those without, and images with faces in receive around 37% more likes than those without (1).
That’s pretty powerful stuff because it tells you exactly why, if you want to increase engagement with your reflexology business on social media, taking better photos matters.
But in a world where everyone and their dog are taking pictures, and posting them on social media, how can you make sure yours stand out?
How can you make sure potential clients stop scrolling and start looking when it comes to your work as a therapist?
Well, you can start by using my top 10 tips!
1) Use Your Phone’s Camera Grid
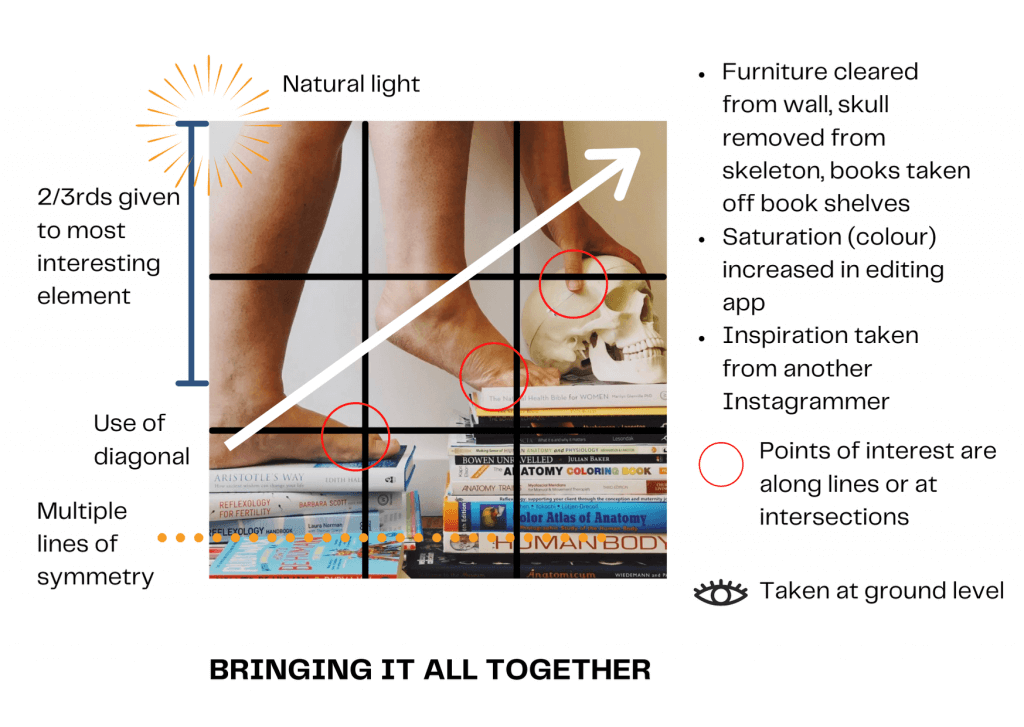
Your phone’s camera has an in-built grid made up of two imaginary horizontal and two vertical lines, dividing the image you see on your screen into nine. This grid helps keep everything in your photo straight, and will allow you to make the best use of established photography conventions like the rule of thirds, symmetry and balance, and angles and diagonals – all of which draw the viewer in.
If you haven’t already switched it on, go to your phone settings, select ‘Camera’ and switch on ‘Grid’.
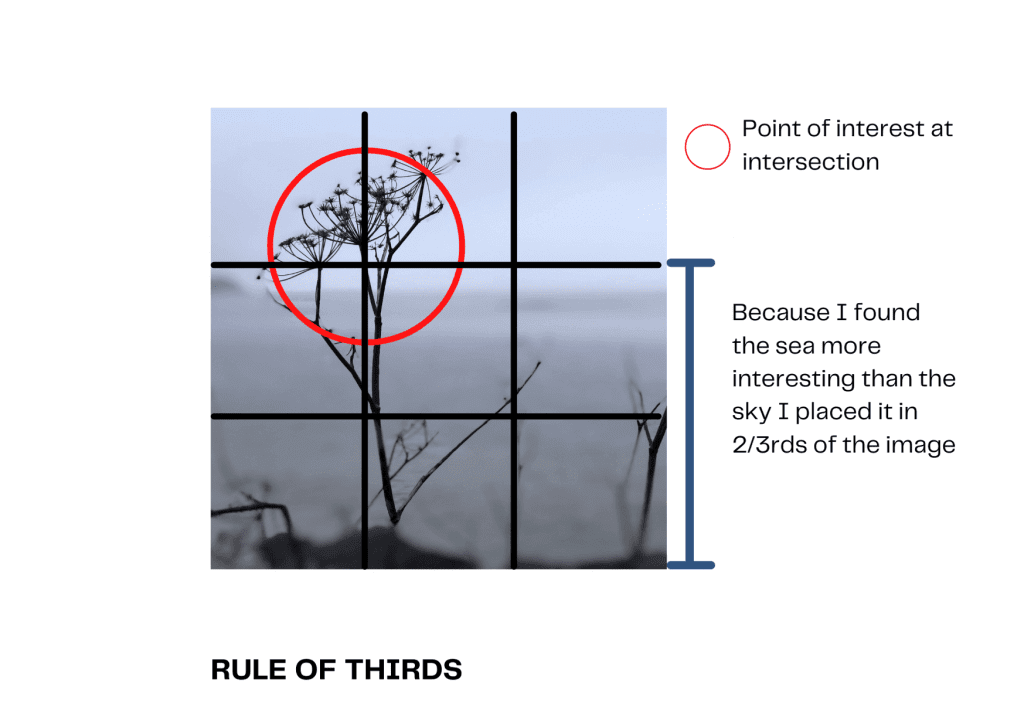
2) Use the Rule of Thirds
Switching on your cameras grid makes using the rule of thirds easy. You simply line up key focal points along or on the intersections of the imaginary horizontal and vertical lines that divide your screen into nine, and use the grid lines to fill two thirds of your screen with the background or foreground.
Following on from my blog post on How Being Comfortable with Your Selfie is Good for Business, rather than trying to place yourself in the centre of the image (which tends to end up with a selfie akin to a passport photo) use the rule of thirds by placing your face in the left or right two thirds, with key facial features placed along the horizontal lines.
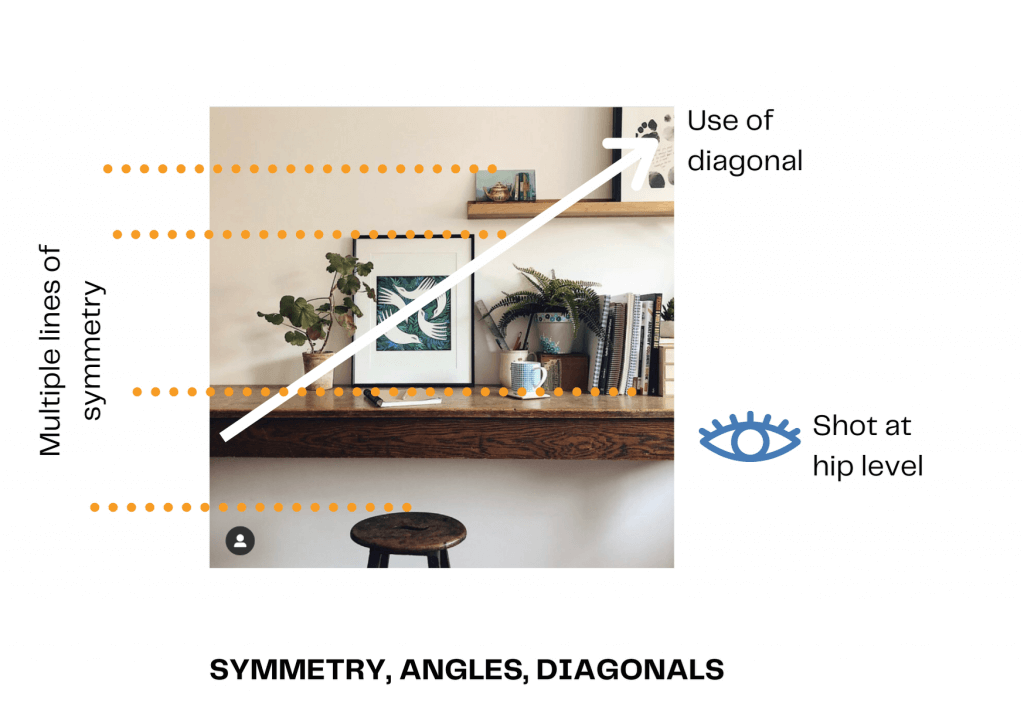
3) Pay Attention to Symmetry and Balance
Where you can see symmetry, use it, because this can balance your image beautifully. For example, the simple lines of horizontal symmetry formed by an image of your work desk – your stool, your desk, and some books.
4) Play with Angles
Don’t just take your photos at eye level. Shoot from hip level for better interior shots, use a set of steps to gain some height for the perfect flat lay, or get down onto the ground for a different viewpoint.
Flat lays are pictures of anything taken from above, and if you have your camera grid turned on you will find that when you tilt your camera horizontally two little ‘+’ will appear, one yellow and one white: line them up and your camera is perfectly horizontal!
Take a look at my post on How to Take Flat Lays for Your Therapy Business for more information on flat lays.
5) Use Diagonals
Using diagonals in photos is a great way of drawing the viewer’s eye through the image.
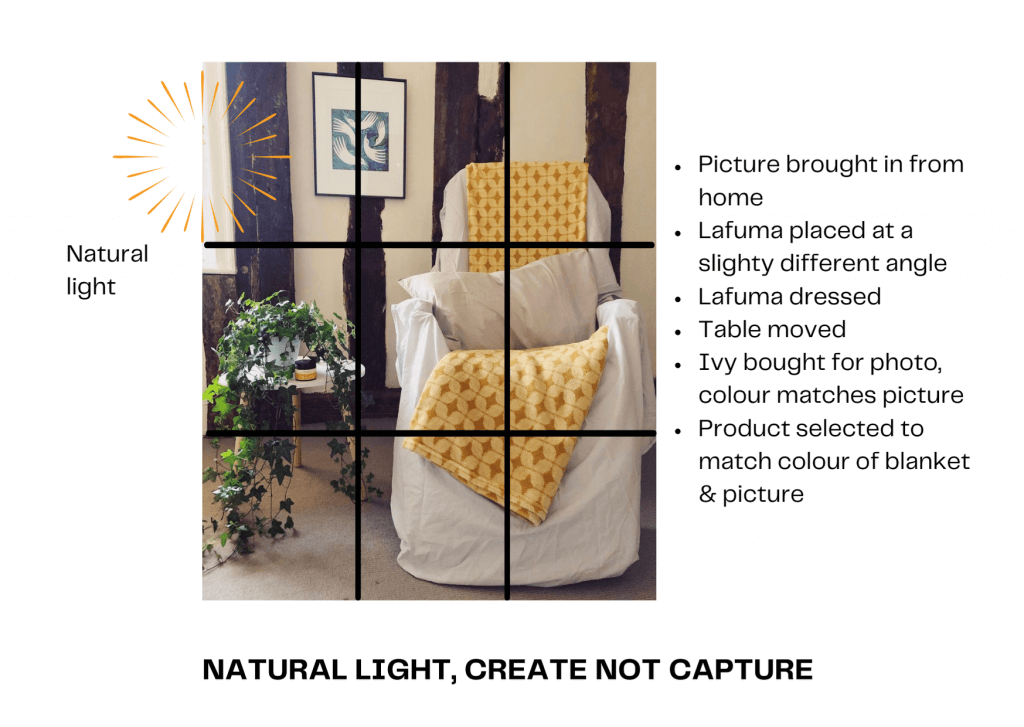
6) Use Natural Light
When you’re indoors, avoid adding light to your image by switching on lamps and lights. Instead work with the natural light you have, as you can add a more natural lighting effect in the editing process (see below).
If the natural light you have isn’t great, then:
- Use the room where the light is greatest and when the light is at its best
- Move around the room to make the most of the natural light you have
- Open doors, pull back curtains etc. to let more light in
7) Think Create not Capture
Essentially what you are doing with photos to promote your work as a reflexologist is creating moments, not capturing them. With this in mind, before you even take your photo set the scene and dress your set. This means getting rid of rubbish, moving cables and other things you don’t want in your picture out of the way, bringing in things you do want in the picture and, if needed, moving furniture – which includes your treatment table!
8) Learn to use an Editing App
Your phone has an inbuilt editing app, which as well as enabling you to crop and straighten an image, allows you to perform basic editing tasks like changing saturation levels, warmth, contrast etc.
Instagram also allows you to edit photos just before you post them, and has similar functionality to your phone’s editing app.
If you want to be able to do more then try Snapseed, Google’s free photo-editing app for android and iOS. It gives you a host of additional features including being able to add elements like brightness and saturation to specific areas of your photograph.
Follow the link for a simple tutorial on How to Use Snapseed: 10 Tips for Better Snapseed Photo Editing from muo.com.
I’d really encourage you to take a couple of photos, grab your favourite hot drink, and then sit down and play around with whatever editing app you want to use to see what it does – just press some buttons and mess around with it.
9) Invest in Some Basic Equipment
You don’t need to spend anything to improve your reflexology business photography, and in fact everything I’ve mentioned in tips 1 through to 8 requires you to spend the princely sum of £0.
However, if you did want to invest in some basic equipment then, at less than £50 for the whole lot, here are my top tips:
- A tripod that’s also a selfie stick
- A Bluetooth shutter release (check the tripod options as sometimes these come as part of the package)
- A selfie ring light which adds the right level of natural light to your face in poor light;
- Materials such as fabric and PVC table cloths to create interesting flat lay backgrounds (see How to Take Flat Lays for Your Therapy Business for more information).
10) Have Fun and Explore
Top of the top tips has to be to have fun and explore. Social media doesn’t have to be a chore, and you don’t have to share every photo you take – that’s the joy of digital photography!
Just mess around, see what you can do, and read around the subject; there are so many great articles online about how to improve your photography, or if you prefer something physical in your hands. then take a look at Hashtag Authentic by Sara Tasker, the face behind @orla_and_me. Full of wonderful photographs, ideas, and easy ‘how to’ tips, it will leave you feeling inspired.
And finally, look around you. Be inspired by people you admire on social media – they don’t need to be therapists – and emulate the best of their photography in the best of yours.
For more on how to improve your photography for your reflexology business then follow me @sarahwoodhousetherapy on Instagram or Facebook where I’ll be sharing tips in my ‘Photography for Holistic Therapists’ blog series.
If you want some 121 support with creating better content, then drop me a line, or keep an eye out for my new online courses to help develop and improve your social media content in spring 2021.
All photographs within the body of the article are © Sarah Woodhouse 2021
Article heading photograph by Maddi Bazzocco
1) https://blog.hubspot.com/marketing/visual-content-marketing-strategy

Sarah Woodhouse is a therapy business coach and mentor, author of Growing Your Therapy Business, and a tutor for the College of Bowen Studies. To find out more about her clinic, books, courses, and her therapist support services go to https://sarahwoodhousetherapy.co.uk